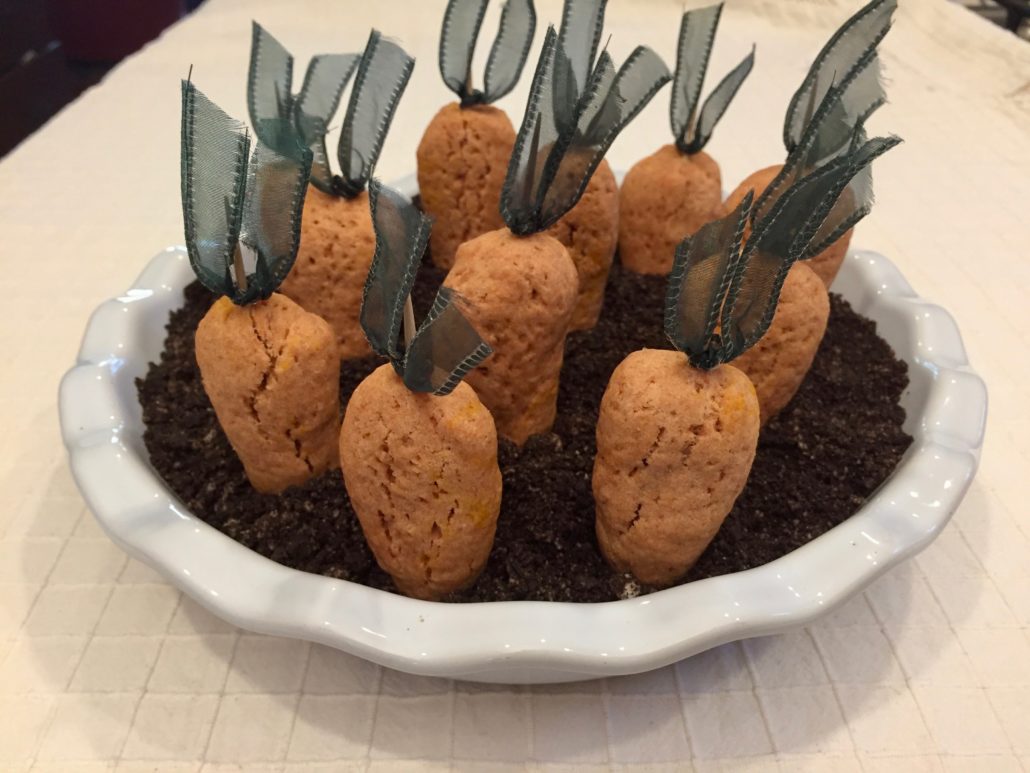
Carrot-Shape Sugar Cookies in Oreo “Dirt”
By request, this is the third year these cookies are part of my Easter menu; they’re becoming a family tradition.
The instructions seem long-winded and intimidating but don’t let the step-by-step instructions alarm you. They’re so worth it. Or recruit the kids and make it a family project; it will be fun!
I use India Tree food coloring (available on Amazon) made from highly concentrated vegetable colorants; they contain no corn syrup or synthetic dyes.
What to do with all the leftover Oreo dirt?
I freeze it for another time; here is one of my favorite ways to use the Oreo crumbs
Epicurious: Frozen White Chocolate and Raspberry Mousse
I’m going to give this Grasshopper a try, it evokes happy childhood memories! Have you ever had Grasshopper Pie?
Simply Recipes: Grasshopper Pie
- 1 1/2 cups whole-wheat flour
- 1 1/2 cups all-purpose flour
- 1 1/2 teaspoon baking powder
- 1/2 teaspoon salt
- 1 cup butter cold but softened
- 2/3 cup granulated white sugar
- 2 eggs
- 2 tablespoons whole milk
- 2 teaspoons vanilla extract
- 1 package Oreo Cookies grind about 6 at a time in food processor/blender
- Dulce de Leche
- In a medium-sized bowl whisk together flours, baking powder, and salt. Set aside.
- In a large bowl cream, with electric beater (or by hand), butter and sugar together for several minutes. Add egg, milk, and vanilla until thoroughly combined.
- Add a few drops of yellow food coloring and one drop of red.
- Slowly add flour mixture until well mixed. Adjust food coloring one drop at a time until it has the desired orange shade.
- Turn off beater and shape dough into a ball.
- Divide in half; roll each half into a log on a silpat or floured surface. If the dough is too soft and sticky, refrigerate for 10 - 15 minutes. Don't let it get too cold or it will be difficult to shape.
- Cut into ½” slices
- Roll (either on the counter or between your palms) each slice into a cone shape
- Place on cookie sheet lined with parchment paper
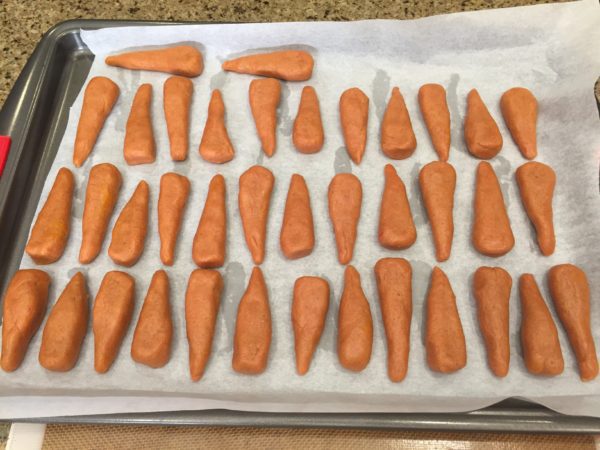
- After cookie sheet is full, slightly flatten the “carrots”
- Refrigerate a couple of hours or overnight; they hold their shape better if they're really cold before baking
- Bake at 350 for 5 – 8 minutes (depending on the size of your “carrots) peeking to make sure the tips don’t get too dark. Cool
- Stick a toothpick in the top of each cookie, carefully pushing it almost all the way in. Make an assembly line. Tie a green ribbon on the tip of toothpick. I use fabric-with-wire ribbon because I can shape them.

- Grind Oreo cookies in a food processor or blender. Place the Oreo “dirt” in a serving dish.
- Dip bottom half of "carrot" cookie into Dulce de Leche and stick in the Oreo dirt.
NOTE: Make ahead so it’s not overwhelming. For example
- 1 or 2 weeks earlier a) make and freeze the cookies to bake later or b) make AND bake the cookies. If making ahead; I freeze them (baked or unbaked it’s the same process) in a large ziploc bag lined with parchment paper. Place parchment paper between the layers or cookies also so they don’t stick together.
- Make the Oreo crumbs by pulsing 6–8 cookies at a time in a blender or food processor. Store in a covered container.
- One or two days before, tie green ribbon on toothpicks and insert into baked cookies. I like using fabric ribbons wire to hold the shape)
- Day of: recruit your kids to dip the “carrots” in Dulce de Leche and place in Oreo “dirt"


Leave a Reply
Want to join the discussion?Feel free to contribute!