Frozen Orange Mousse Torte with Berry Sauce

I get enthused about certain recipes and make them with frequency until they’re no longer interesting and they fall off my repertoire. But this recipe has endured more than 10 years of entertaining.
It’s one of my absolute favorite desserts because:

  •  everyone loves it
  • can be made days in advance
  • gluten-free
  • can double recipe for a large dinner party (24 guests). I cut modest size servings and can serve 12 per torte
Frozen Orange Mousse Torte
Print Recipe
Servings
12 - 16 servings
Servings
12 - 16 servings
Frozen Orange Mousse Torte
Print Recipe
Servings
12 - 16 servings
Servings
12 - 16 servings
Ingredients
Make Crust
Make Berry Sauce
Make Mousse
Adjust servings: servings
Units:
Instructions
Make Crust
  1. Preheat oven to 350°F.
  2. Blend first 4 ingredients in processor until almonds are coarsely chopped.
  3. Add melted butter and blend until moist crumbs form. Using a square of parchment paper, press almond mixture onto bottom (not sides) of 9-inch-diameter spring-form pan.
  4. Bake crust until golden, about 8 minutes.
  5. Chill while preparing mousse.
  6. Can be prepared a week or two before, covered and frozen.
Make Berry Sauce
  1. Place berries, sugar and orange juice in a medium saucepan.
  2. Bring to a boil, turn down to simmer and cook about 10 minutes. Cool.
  3. Purée berry mixture in processor. Strain through sieve set over bowl, pressing on solids.
  4. Mix in orange juice and peel. Cover and refrigerate until cold.
  5. Can be made the weekend before. Keep refrigerated.
Make Mousse
  1. Whisk orange juice, sugar and egg yolks in a medium metal bowl.
  2. Set bowl over saucepan of simmering water (the bowl should not to touch the water). Whisk until candy thermometer registers 170°F, about 5 – 6 minutes.
  3. Remove bowl from over water. Using electric mixer, beat yolk mixture until cool and thick, about 6 - 8 minutes. Carefully mix in 1 cup plain Greek yogurt. Beat in Grand Marnier.
  4. In a separate bowl, beat 1 cup cream and orange peel in bowl until stiff. Fold cream into yolk mixture. Pour mousse into crust.
  5. OPTIONAL: Beat 1/3 whipping cream until stiff. Spoon whipped cream into pastry bag fitted with medium star tip. Pipe cream around top edge of torte. Cover spring form pan and freeze overnight. *
Serve
  1. Cut around pan sides to loosen torte. Release pan sides.
  2. Cut torte into wedges.
  3. Pour a couple spoonfuls of Berry Sauce on each wedge and serve.
Recipe Notes

*Note: Frozen torte can be made a week or a few days before. Cover springform pan tightly with cling wrap.

Modified from:

Epicurious: Frozen Mousse Orange Torte with Boysenberry Sauce

Share this Recipe

Carrot-Shape Sugar Cookies in Oreo “Dirt”

By request, this is the third year these cookies are part of my Easter menu; they’re becoming a family tradition.

The instructions seem long-winded and intimidating but don’t let the step-by-step instructions alarm you. They’re so worth it. Or recruit the kids and make it a family project; it will be fun!

I use India Tree food coloring (available on  Amazon) made from highly concentrated vegetable colorants; they contain no corn syrup or synthetic dyes.

What to do with all the leftover Oreo dirt?
I freeze it for another time; here is one of my favorite ways to use the Oreo crumbs
Epicurious: Frozen White Chocolate and Raspberry Mousse

I’m going to give this Grasshopper a try, it evokes happy childhood memories! Have you ever had Grasshopper Pie?

Simply Recipes: Grasshopper Pie

Carrot Shape Sugar Cookies in Oreo Dirt
Print Recipe
Carrot Shape Sugar Cookies in Oreo Dirt
Print Recipe
Ingredients
Adjust servings:
Units:
Instructions
  1. In a medium-sized bowl whisk together flours, baking powder, and salt. Set aside.
  2. In a large bowl cream, with electric beater (or by hand), butter and sugar together for several minutes. Add egg, milk, and vanilla until thoroughly combined.
  3. Add a few drops of yellow food coloring and one drop of red.
  4. Slowly add flour mixture until well mixed. Adjust food coloring one drop at a time until it has the desired orange shade.
  5. Turn off beater and shape dough into a ball.
  6. Divide in half; roll each half into a log on a silpat or floured surface. If the dough is too soft and sticky, refrigerate for 10 - 15 minutes. Don't let it get too cold or it will be difficult to shape.
  7. Cut into ½” slices
  8. Roll (either on the counter or between your palms) each slice into a cone shape
  9. Place on cookie sheet lined with parchment paper
  10. After cookie sheet is full, slightly flatten the “carrots”
  11. Refrigerate a couple of hours or overnight; they hold their shape better if they're really cold before baking
  12. Bake at 350 for 5 – 8 minutes (depending on the size of your “carrots) peeking to make sure the tips don’t get too dark. Cool
  13. Stick a toothpick in the top of each cookie, carefully pushing it almost all the way in. Make an assembly line. Tie a green ribbon on the tip of toothpick. I use fabric-with-wire ribbon because I can shape them.
  14. Grind Oreo cookies in a food processor or blender. Place the Oreo “dirt” in a serving dish.
  15. Dip bottom half of "carrot" cookie into Dulce de Leche and stick in the Oreo dirt.
Recipe Notes

NOTE: Make ahead so it’s not overwhelming. For example

  • 1 or 2 weeks earlier a) make and freeze the cookies to bake later or b) make AND bake the cookies. If making ahead; I freeze them (baked or unbaked it’s the same process) in a large ziploc bag lined with parchment paper. Place parchment paper between the layers or cookies also so they don’t stick together.
  • Make the Oreo crumbs by pulsing 6–8 cookies at a time in a blender or food processor. Store in a covered container.
  • One or two days before, tie green ribbon on toothpicks and insert into baked cookies. I like using fabric ribbons wire to hold the shape)
  • Day of: recruit your kids to dip the “carrots” in Dulce de Leche and place in Oreo “dirt"
Share this Recipe

Spinach Pancakes

These pancakes from weelicious are yummy and fun. Move over green eggs and ham! I always love an opportunity to punch up the nutrition in breakfast and this is a perfect example. I also love tempting kids to eat something they might not otherwise want to. So without hinting at the reason for the green, I simply made them for brunch on a St. Patrick weekend and everyone, even the littlest guest, all of 18 months, ate their fill.

Because I usually don’t have buttermilk, I mix 1 cup milk with 1 tablespoon apple cider vinegar (or white wine vinegar) and let it sit 10 – 15 minutes before making the recipe.


Spinach Pancakes
Print Recipe
Spinach Pancakes
Print Recipe
Ingredients
Adjust servings:
Units:
Instructions
  1. In a blender, combine the spinach, buttermilk, egg, and oil and blend
  2. until smooth.
  3. In a separate bowl, whisk together the remaining ingredients.
  4. Mix the wet ingredients into the dry ingredients until just combined.
  5. Heat a large pan or griddle over medium heat and grease with butter or expeller-pressed canola oil.
  6. Pour about 1 tablespoon of the pancake mixture onto the griddle, cook about two minutes.
  7. Flip the pancakes and cook for one minute longer and serve.
Recipe Notes
Share this Recipe

Very Blueberry Scones

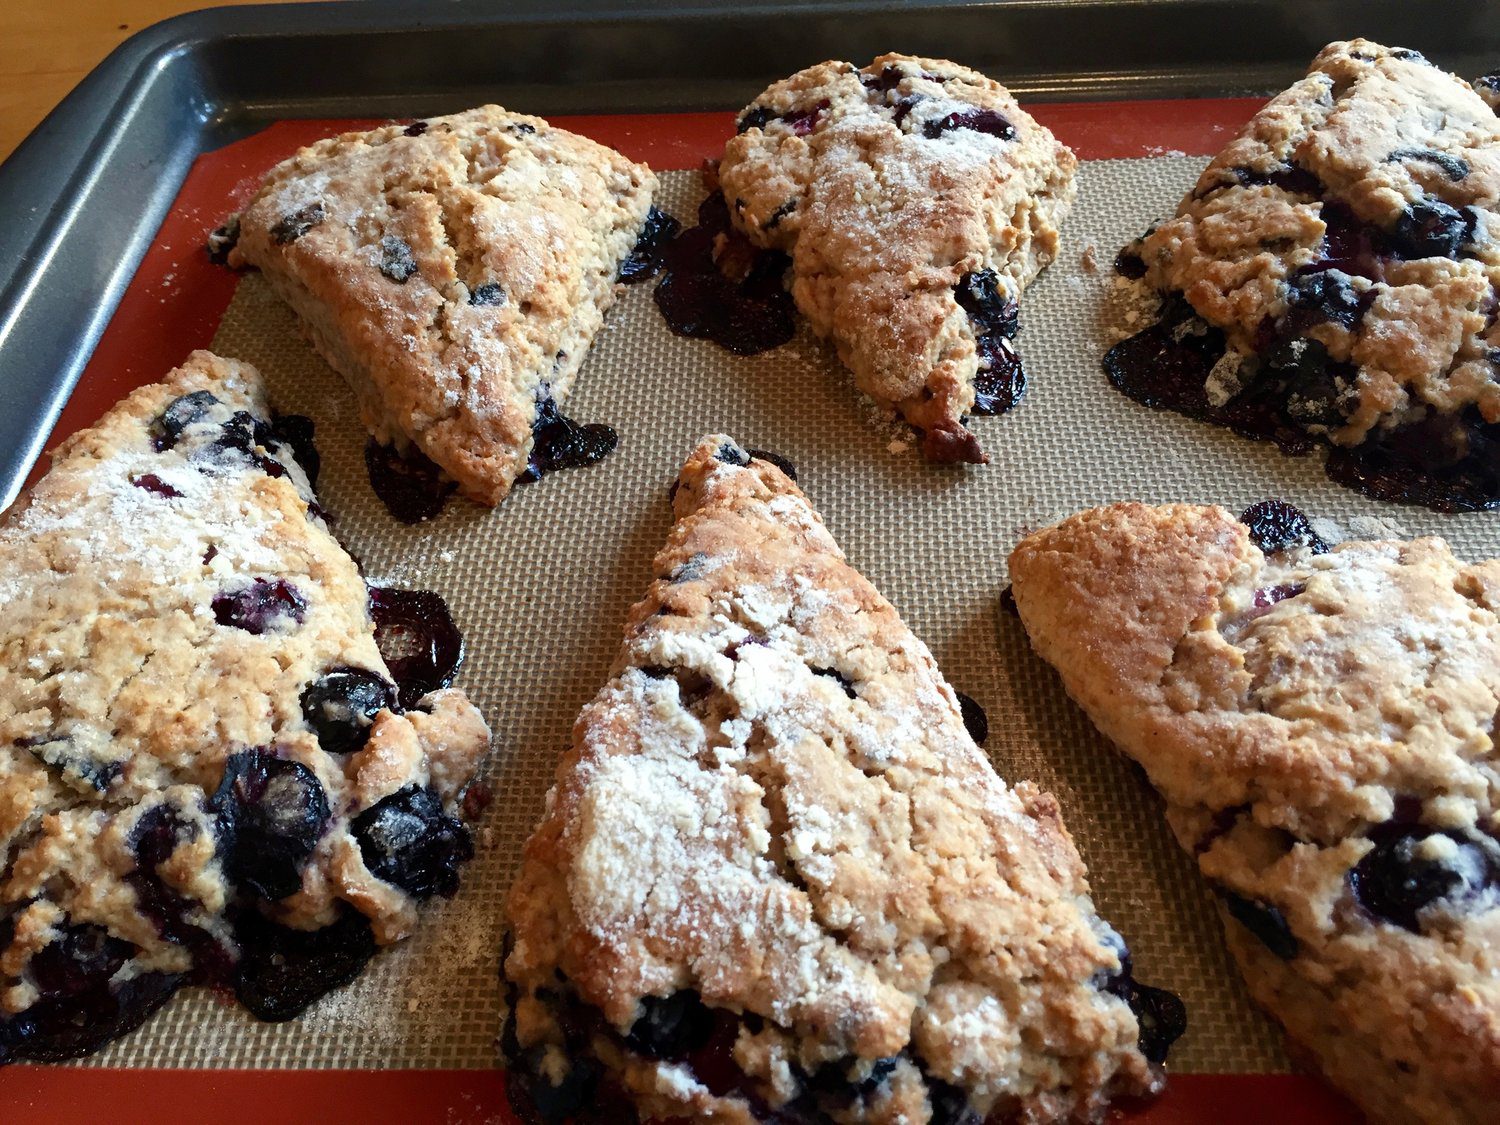
Loaded with blueberries, these buttery scones are one of our all-time family favorites. If fresh blueberries are not in season, frozen blueberries work just as well, and even dried blueberries.
Raspberries or blackberries could be used instead.

Very Blueberry Scones
Print Recipe
Servings
8 servings
Servings
8 servings
Very Blueberry Scones
Print Recipe
Servings
8 servings
Servings
8 servings
Ingredients
Adjust servings: servings
Units:
Instructions
  1. Position rack in top third of oven and preheat to 425°F. Line large baking sheet with parchment paper.
  2. In a large bowl mix whole-wheat flour, all-purpose flour, baking powder, ginger and sugar.
  3. Add butter pieces, mash into flour with fork and then using fingertips, rub in chilled butter until pieces are size of small peas.
  4. Mix 1 cup buttermilk and lemon zest. Pour buttermilk mixture into dry ingredients and stir just until milk is blended in (it will be thick and somewhat sticky).
  5. Add blueberries and gently fold in; not all blueberries will get fully mixed in.
  6. Transfer dough to a floured work surface and divide dough in half. Form each half into a flat disc, then cut each disk into 6 wedges.
  7. Transfer scones to prepared baking sheet, spacing 1 inch apart. Bake until scones are golden brown on top and toothpick inserted into center comes out clean, about 25 minutes.
Share this Recipe

Chocolate Zucchini Cupcakes

These cupcakes are hugely popular with all our friends and family. The hint of cinnamon, the richness of cocoa and the bits of chocolate make every bite delicious. The zucchini adds moisture and putting a vegetable boost into dessert is good for a mother’s heart.

They are so yummy, they don’t really need frosting. But I’ve made them so many times over the years, I’ve served them differently pending on what I had in the refrigerator: a cream cheese icing (blend cream cheese sweetened to taste with honey, real whipped cream with a tablespoon of cocoa folded in and sweetened to taste with powdered sugar or a chocolate butter cream icing.

For a super duper chocolate treat on a special occasion with a chocolate glaze (melt equal parts semi-sweet chocolate and butter or coconut milk). For these, I bake the cupcakes in a mini-muffin tin.

In general I do not use cupcake liners, they just go straight to the landfill.

Chocolate Zucchini Cupcakes
Print Recipe
Servings
8 cupcakes
Servings
8 cupcakes
Chocolate Zucchini Cupcakes
Print Recipe
Servings
8 cupcakes
Servings
8 cupcakes
Ingredients
Adjust servings: cupcakes
Units:
Instructions
  1. Preheat oven to 350°F with rack in middle. Grease muffin tin with butter or coconut oil.
  2. Whisk together flour, cocoa, cinnamon, baking soda, baking powder, and salt.
  3. Beat together sugar, oil, egg, and vanilla in a large bowl with an electric mixer until thick and creamy, 2 to 3 minutes.
  4. At low speed, mix in flour mixture until just incorporated. Stir in zucchini and chocolate chips.
  5. Pour into muffin tin and bake until tops spring back when lightly pressed, 25 - 30 minutes.
Share this Recipe

Carrot Cake Cupcakes

This is a delightful recipe from Cooking Classy. I modified it by adding fresh ginger, reduced the sugar and used coconut oil.

Rather than the Cream Cheese frosting from the original recipe, I made Whipped Orange Cream because I had heavy cream in my refrigerator.

But check out the original recipe with its marzipan carrots!

Carrot Cake Cupcakes
Print Recipe
Servings Prep Time
12 cupcakes 30 minutes
Cook Time
20 minutes
Servings Prep Time
12 cupcakes 30 minutes
Cook Time
20 minutes
Carrot Cake Cupcakes
Print Recipe
Servings Prep Time
12 cupcakes 30 minutes
Cook Time
20 minutes
Servings Prep Time
12 cupcakes 30 minutes
Cook Time
20 minutes
Ingredients
Adjust servings: cupcakes
Units:
Instructions
  1. Preheat oven to 350 degrees. In a mixing bowl, whisk together flour, baking soda, baking powder, salt, cinnamon, and nutmeg for 30 seconds, set aside. Shred carrots as directed in notes below, set aside.
  2. In a separate large mixing bowl, whisk together granulated sugar and brown sugar, then add eggs and using an electric hand mixer, blend mixture on low speed 30 seconds, until slightly pale. Mix in applesauce and vanilla extract. With mixer running on low speed, slowly pour in vegetable oil and mix until combined, then mix 20 seconds longer. Mix in half of the dry ingredients, then pour the shredded carrots into the bowl with the remaining flour mixture and toss in flour mixture to coat carrots (they'll clump together a bit but that's fine). Pour carrot mixture into the batter and blend until evenly combined.
  3. Pour batter into paper-lined muffin cups, filling each cup about 3/4 full. Bake in preheated oven until toothpick inserted into center of cupcake comes out clean, about 19 - 21 minutes. Cool in muffin tin several minutes then transfer to a wire rack and cool completely.
Share this Recipe

Pumpkin Apple Muffins

Every bite of these muffins tastes like fall, evoking cooler weather and a kaleidoscope of orange, gold, rusts and red color in the trees.

The flavor and texture is so lovely and the nutrition of pumpkin, apple, nuts and seeds motivate me to make them at other times of the year as well.

[su_expanding_quote_book source_author=”Steven Pratt, M.D., and Kathy Matthews” source_title=”SuperFoods Rx: Fourteen Foods that Will Change Your Life” affiliate_link=”http://amzn.to/1TGUOyo” full_quote=”Pumpkin packs an abundance of disease-fighting nutrients, including potassium, magnesium and vitamin C and E. The key nutrient that boosts pumpkin to the top of the Superfoods Rx list is the synergistic combination of cartenoids. Pumpkin contains one of the richest supplies of bioavailable cartenoid known to man. Cartenoids are deep orange, yellow or red colored compounds that help protect us from free radicals, modulate our immune response, enhance cell-to-cell communication, and decrease the risk of cataracts and macular degeneration. Cartenoid-rich foods have been shown to reduce the risk of various cancers, lower and rates of heart disease.” short_quote=”Pumpkin packs an abundance of disease-fighting nutrients, including potassium, magnesium and vitamin C and E”]
pumpkin and apples
Pumpkin Apple Muffins
Print Recipe
Servings
18 muffins
Servings
18 muffins
pumpkin and apples
Pumpkin Apple Muffins
Print Recipe
Servings
18 muffins
Servings
18 muffins
Ingredients
Adjust servings: muffins
Units:
Instructions
  1. Preheat oven to 350°F. Grease muffin pan with a pastry brush (or paper towel dipped in) expeller-pressed canola or coconut oil.
  2. Mix first flour, cardamom and baking power into medium bowl.
  3. Stir pumpkin, oil, sugar and eggs in large bowl until well mixed. Mix in dry ingredients. Add apples, raisins and walnuts mixing just until blended.
  4. Place equal amounts of batter into prepared cups, fill almost to rim. Sprinkle pumpkin seeds on top.
  5. Bake 25 – 30 minutes.
Recipe Notes
Share this Recipe

A Healthy Twist on a French Classic

I find bison a better alternative to beef, because bison are grass-fed and industry standards don’t allow the use of hormones or routine antibiotics, which are often given as growth promoters to cattle.

Meatballs are usually associated with spaghetti sauce, but this recipe takes them to another level, rich, hearty and satisfying.

My daughter eats just about everything, but she balked at the wine sauce, so here are two options to make it child friendly:

– Omit the brandy and replace 1 cup of wine with another cup of beef broth for a total of 2 cups of broth. It tastes much lighter. Some adults might prefer it this way too.

– Reserve some of the baked meatballs and serve them to children without the sauce.

My favorite way to serve this is with rice, but is also pairs nicely with roasted potatoes, or even noodles with poppy seeds in a goulash-like style.

Bison Meatball Bourguignon
Print Recipe
Servings
4 - 6
Servings
4 - 6
Bison Meatball Bourguignon
Print Recipe
Servings
4 - 6
Servings
4 - 6
Ingredients
Meatballs
  • 3/4 cup oats old-fashioned
  • 1 1/2 pounds bison ground
  • 2 eggs large, beaten
  • 1/4 cup red onion finely chopped
  • 2 tablespoons parsley fresh, finely chopped
  • 2 tablespoons thyme optional, finely chopped
  • 1 1/2 teaspoons salt kosher
  • 1/2 teaspoon black pepper coarsely ground
Bourguignon sauce
Adjust servings:
Units:
Instructions
  1. To make the meatballs, mix all the meatball ingredients—oats, ground bison, eggs, onion, parsley, salt, and pepper and mix well. Cover and refrigerate for at least 15 minutes or up to 4 hours.
  2. Position a rack in the center of the oven and preheat to 375°F. Lightly oil a metal roasting pan.
  3. Using your wet hands rinsed under cold water, shape the meat mixture into 18 equal meatballs. Arrange in the roasting pan and bake until lightly browned, 20 to 25 minutes.
  4. Transfer the meatballs to a plate.
  5. Meanwhile, start the sauce. Heat canola oil and butter in large saucepan over medium heat and add the mushroom and onion. Stir occasionally, until browned, about 7–8 minutes. Stir in the carrot. Sprinkle with the flour and stir well. Stir in broth, wine, brandy, tomato paste, and thyme and bring to a boil. As soon as it boils, reduce to low heat and simmer until lightly thickened, about 10 minutes, checking periodically to make sure it does not dry. Add a couple of tablespoons of water if needed.
  6. Return the meatballs to saucepan and cook another 10–15 minutes. Season with salt and pepper.
  7. Serve hot, sprinkled with parsley.
Recipe Notes
Share this Recipe